Tutorial: Building and deploying a web application using the Connect APIs
This tutorial takes you through the steps required to build and deploy an example web application using the Device Management Connect and Notification APIs.
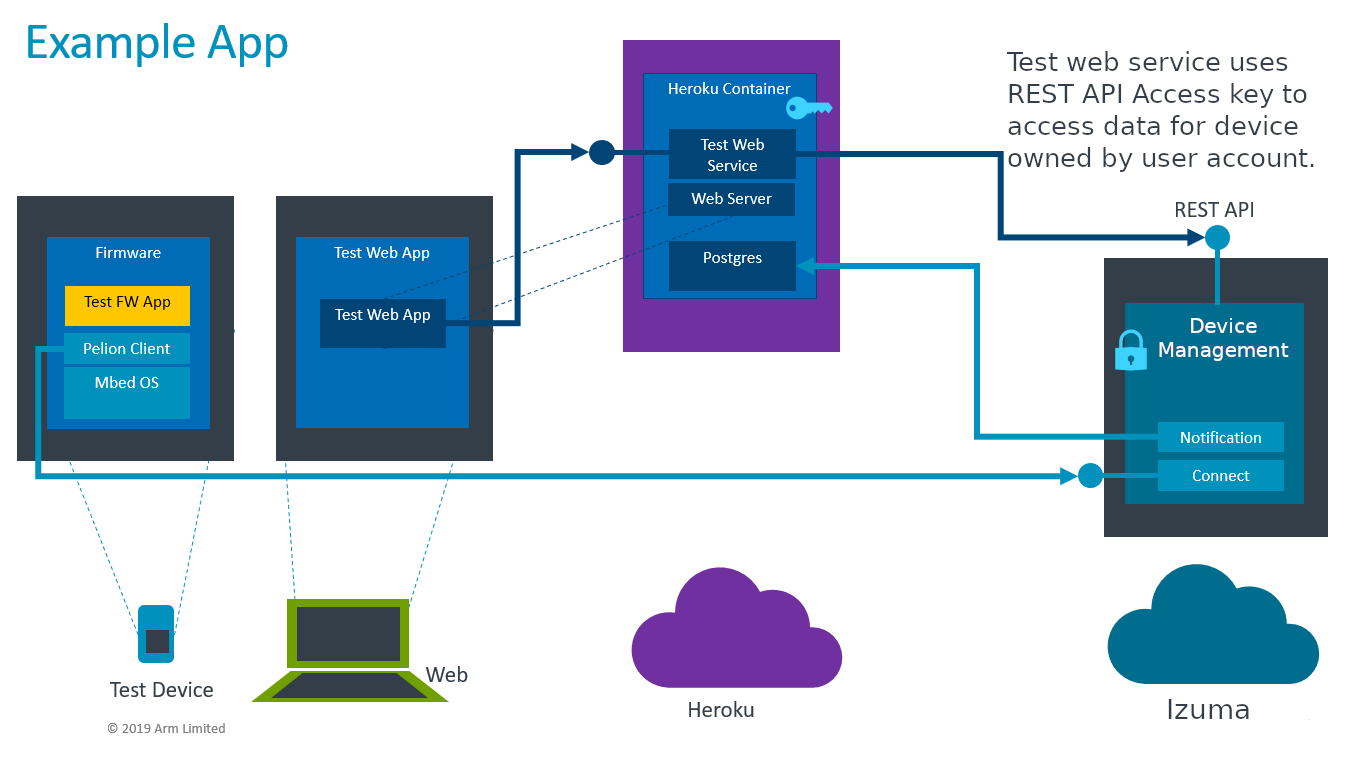
The main components of the example application are:
- An express.js web server running on Heroku. This works with other hosting services, but we've chosen Heroku because it's free.
- A web application build using
react.js, which is served from the web server. - A Postgres database to store data values from subscriptions to the Device Management APIs. Heroku includes Postgres access.
- An Izuma account.
- An Izuma-ready IoT development board (in this example, a DISCO 475) generating resource values.
Note: This is an example only. Your own deployment and architecture may vary.
This tutorial covers:
- Pelion-ready boards.
- The materials, knowledge, and accounts you need to develop and integrate an application.
- Connecting a device to Device Management.
- Subscribing to device resource changes through Device Management.
- Storing those values in a time series database.
- An example web application front end, which pulls data from a web service API to create a visualization of the stored time series data.
Prerequisites
This tutorial assumes you have:
Materials:
- A supported Izuma-ready development board.
- Depending on your board, you might need an SD or micro SD card.
- A laptop or workstation on which you can modify settings.
- Programming tools such as a text editor, Git, and Docker.
- A suitable USB cable to connect your board to a laptop or workstation.
- Depending on the connection capabilities of your board, an Ethernet cable.
Accounts:
You need free accounts for:
Skills and knowledge:
- Basic familiarity with:
- Web application front-end and back-end architecture.
- Web development and security concerns.
- Setting up web services and applications.
- Javascript or typescript programming languages.
Connect your device to Device Management
Once you've set up your accounts, follow the Client tutorials. When you've completed this and checked that your device is connected to Device Management, you're ready to install and run the web application example.
Application startup
Note: For this tutorial, use webhooks (see Config vars).
At startup, the app initializes the database table and sets up a callback channel (webhook) with Device Management.
Create the webhook in setup.ts:
  const webhookBody = {
    url: webhookURI,
    serialization: {
      type: "v2",
      cfg: {
  include_timestamp: true,
      },
    },
  };
  await fetch(webhookUrl, {
    headers: { ...headers, "content-type": "application/json" },
    method: "PUT",
   body: JSON.stringify(webhookBody),
  }).then(checkStatus);
The app then sends a request to set up the subscription to device resources, after building the header in pollValues.ts:
  // POST /v2/device-requests/{deviceID}?async-id={asyncId}
  const url = `${deviceRequestUrl}/${device.id}?async-id=${asyncId}`;
  await fetch(url, {
    method: "POST",
    headers,
    body,
  })
  .then(checkStatus)
Device resource changes
When the resource value on a device changes, the client running on the device sends an event over the CoAP connection to Device Management. The notification channel updates with this information, and an event is triggered using the webhook.
The web app listens for these notification events in index.ts:
  // If using webhooks, provide a callback endpoint on the server for notifications
  if (!LONG_POLLING_ENABLED) {
    expressServer.all("/callback", async (req, res) => {
      try {
        handleNotification(req.body);
      }
When a notification is received, the event is handled, and the spayload from the notification is stored in the Postgres database, which includes a timestamp of when the resource changed (see dbActions.ts):
  const text =
    "INSERT INTO resource_values(device_id, path, time, value) VALUES($1, $2, to_timestamp($3 / 1000.0), $4) RETURNING *";
  const values = [deviceId, path, Date.now(), payload];
  try {
    const res = await pool.query(text, values);
Visualizing data
The react app periodically requests all data from the server for each device, and visualizes this using the Recharts library. The data is stored in the database as a time series when the resource change events occur. The graph library takes this data with time as the X-axis and plots a graph.
There are different approaches to updating and refreshing the UI with the latest data. This example uses a polling approach.
If the resource data covers a long period of time at high frequency, the web server can filter the results to display a suitable number of data values based on the width of the UI elements on the rendering device. Consider these issues when you are designing your own application architecture.
Sending data values to the device
Specific resources on a device are writable resources, which means you can modify the value with a PUT request. See your device firmware to learn which resources you can modify.
In the example application, the PUT request is an API provided by the web app to the web client running on the local browser. This request is handled and is converted into a call to Device Management APIs on the corresponding device.
Application deployment
There are two options for deploying your application:
- Deploy from GitHub.
- Run locally.
Regardless of your deployment method, you'll set config vars, provision a database, and check for issues before deploying.
Set config vars
Heroku applications provide configuration options through environment variables called config vars. Two are required for this app, API_KEY and APP_HOST. Three more are optional:
| Key | Value | Required | Default value |
|---|---|---|---|
| API_KEY | <access_key> | Yes | |
| APP_HOST | https://<app_name>.herokuapp.com | Yes | |
| API_HOST | <api_host> | No | https://api.us-east-1.mbedcloud.com |
| LONG_POLLING_ENABLED | true or false |
No | false |
| DEVICE_ID | Comma-separated list of device IDs | No | * |
| RESOURCE | Comma-separated list of resource paths | No | /3303/* |
To view and set config vars:
- View your Heroku dashboard and select your application.
- Select Manage App > Settings > Reveal Config Vars.
Note: The default behavior of the example application is to subscribe to all resource change notifications for devices connected to your account, and specifically to listen for changes to temperature sensor resources. If your device has other hardware capabilities, modify your device firmware to send those values as resources and configure the settings above to listen to the correct resource path.
Provision a database
This app requires access to a Postgres database to store resource values, which Heroku provides for free-tier accounts.
Check for issues
The Heroku app deploys into dynos, hosted containers running application code. The website provides application output and logs.
Deploying your application
Now that you have completed integration and setup, run your app.
Option 1: Deploy from GitHub
Choose this to create an application in Heroku by cloning from an existing Git repository.
In your application dashboard under Deployment method, click GitHub, and follow the instructions in the pop-up to connect your accounts.
Once this process is complete and Heroku builds your application, click Open app at the top of your dashboard to run it.
Option 2: Run locally using Docker
To run locally and see how the components store data in the Postgres database:
- Generate an access key.
- If you don't already have it, install Docker Desktop on your local machine.
- Clone the example application repository.
- Replace
<api_key>with your access key in the.envfile. - Run
docker-composein the command line. - Open your browser to http://localhost:5000/ to view.
Check deployment and compare to reference version
The app is also available in a hosted version, so you can compare the existing application with your instance.
Inactive Heroku dynos go into power-saving mode. The dyno can take 10-20 seconds to wake up when you return.
Summary
During this tutorial, you:
- Created accounts for Mbed, Pelion, and Heroku.
- Selected and acquired a board for development.
- Connected your board to Device Management using the Quick Connect guide.
- Cloned the example application repository.
- Set config vars.
- Provisioned a database.
- Deployed and ran your application using the APIs.
- Managed device resources.